QLAs – How to Use Them Well

Question level analysis (big old spreadsheets which look very colourful and contain data about how every student did on every question) are time consuming to produce and, by themselves, are not useful. Data managers and trust-leads might insist on them but they are nothing but a superficial exercise until they are used purposefully. This post will explore some common pitfalls and what should be done instead to make the most out of these documents.

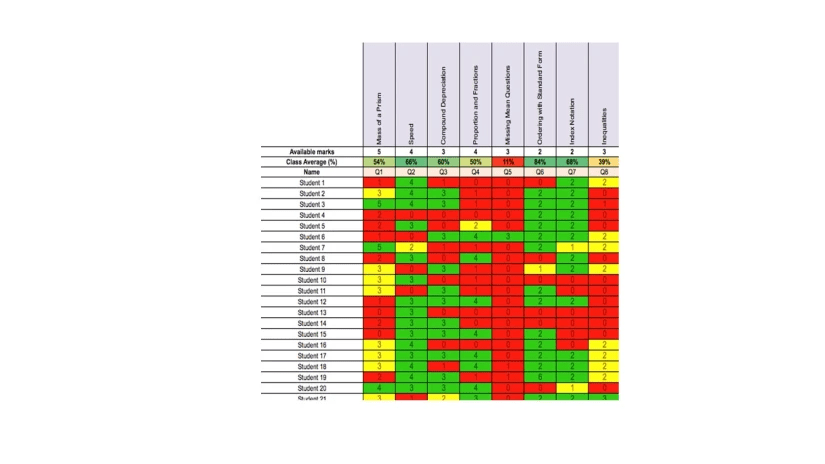
  1. Don’t forget what the question was. It’s typical to give a brief name to the columns that refer to the broad topic being assessed. When you see a big column of red under a question title, do not just assume everything about that topic needs to be retaught. Go back and look at the exact question that was in the paper, then look at a select group of student responses. Was there a common misconception that needs addressing? Was this question quite a complex reasoning question and the subject knowledge on the actual topic is fine? Was this combined with one or two other topics which is where the weaknesses actually lay?
  2. Focus on the highest leverage areas. When choosing which columns to focus on, the ones with the most “red” are not necessarily the best. Near the end of the paper it would be typical for questions to be harder. Where possible, compare the performance with a nationally representative data set. From here you should focus in on where the biggest differences from the norm are. That way you know you are focusing on marks which are more accessible.
  3. Teach a few things well, not everything poorly. It can be tempting when presented with data like this to what to go over every single gap. Produce 30 individualised worksheets that all focus on different weak areas for students. The issue here is that without being able to give them all 1-1 tuition (giving them model answers does not count) they won’t be able to learn from this experience. It is your job when reviewing whole class assessments to do the greatest good for the greatest number, teaching those things well is better than teaching everything poorly.
  4. Praise the good. As teachers we are always looking for the gains, our eyes will immediately be drawn to the red. Take time out to praise the class on their areas of strengths. Highlight the positives and, where possible, show them the progress they’ve been making over time. Tests can be stressful and saying “well done” is not just something they’ve earned, it’s the right thing to do.
  5. Be proactive as well as reactive. This data is going to be produced as a result of the teaching this class had. As well as being reactive in the moment to this class don’t forget to be proactive as well. Making any alterations to the curriculum so that future classes don’t fall into the same trap as your current class is going to ensure future students benefit from this knowledge.
  6. Quick-wins vs Reteach. There will be some minor errors that some students made and some quick-wins which can be easily addressed but may need to be revisited frequently. This will also show up some huge gaps in their learning which may need multiple lessons to address. Split these up accordingly. Have a group of things which will require substantial re-teach time and a group of smaller things which can be addressed at the starts to lessons.
  7. Don’t focus on the specifics of the question. When a question has bene identified as one that has been underperformed on then make sure you do not address the specifics of the question but rather the root cause of the mistakes. It is pointless going through that specific question in detail and then giving students time to practice almost identical questions just with different numbers. You need to diagnose the gap in their understanding and teach more holistically. That exact question won’t come up again, make sure you fix the cause, and not just the symptom.

I think QLAs can be an incredibly powerful tool but it’s important to remember that is all they are, a tool. A tool can be used well and it can be used poorly. If you have any other tips to add please share them in the comments.

Also, if you’re reading this because mock-season is coming then you may also be interested in this post about marking papers to ensure the data is reliable in the first place.

I’m always interested in what people make of this so please feel free to comment with thoughts, questions or incomplete musings. Follow this or my Twitter account Teach_Solutions for similar content in the future. Also, check out the rest of this site, there’s some good stuff knocking about the place.

Department Handbooks

If you were thinking this swanky site was just built to hold a selection of dis-connected blogs, you’d only be 90% correct. There are a couple of things of actual use too.

One of those things is a Maths Department Handbook that I put together. When I was Head of Department I was lucky enough to have no staff turnover. This meant that building something over time was easier to do. Trying to do this in the current climate, without a handbook, I think would be nearly impossible.

With the current rates of turnover, leading training one day means there is no guarantee of that idea or initiative still being in place a year later unless it is captured somewhere. This is where a handbook comes in.

Unfortunately they are incredibly time consuming to produce. Certainly in the first instance. Adding things afterwards, less so, but the initial investment to make one often involves time that people just don’t have.

When I started as a HoD, the department had a progress score of 0. This was increasing each year by about 0.4. I left in the year of the TAGs but in the first validated set of results, 4 years after I started, the department managed a score of +1.77. I say this just to help lend an air of credibility to the document and its contents.

I’m no longer a HoD but I recently had the time and created a handbook. I tried to capture lots of the things we did and lots of the things I wish we’d have done in my old department. I want to provide you with an editable version to either read or to use as a basis for your own. I hope there are some ideas in there that might be new to you and that you learn something from but most of all I hope it saves you some time.

It is the first link the “Documents” part of this site which you can either get to by clicking the link or through navigated the site yourself.

Here are a couple of snippets from the handbook so you get a sense of what’s inside.

Hope it helps!

I’m always interested in what people make of this so please feel free to comment with thoughts, questions or incomplete musings. Follow this or my Twitter account Teach_Solutions for similar content in the future. Also, check out the rest of this site, there’s some good stuff knocking about the place.

Marking Maths: It’s Either Right or Wrong. Right? Wrong!

Looking at how maths marking is harder than people think, why it’s important and what can be done about it.

“It’s either right or wrong” isn’t it? Well, is it? No, I don’t think so. It isn’t? No, it isn’t. It’s more than that? It is. How do you know? Here’s how.

On Twitter, when it was still called Twitter, I put 6 mock student responses to questions up alongside the mark scheme. Underneath each was a poll that captured the marks people would award the student. Here are the questions and results. I’ll put the questions first so if you want to play along and mark them yourself without being swayed, feel free. The results are after. Note that the answer highlighted in blue is just the most common response, not necessarily the correct response. The correct responses will be looked at near the end of this post. Each was answered by about 2,000 people.

Question 1:

Question 2:

Question 3:

Question 4:

Question 5:

Question 6:

Poll results (answer in blue is not necessarily correct, just most popular):

I have done this exercise, or similar, with teachers and every time the results are about as varied as this. It shows, fairly conclusively, that marking a maths paper is not as simple as some might think. Let’s go through why this is important and what can be done about it.

Why is this important?

No matter what your philosophy of mathematics teaching is and regardless of what you think about exams etc, it is hard to argue that we are doing students a disservice if we don’t prepare them for their exams. A small but crucial part of this is exam technique. If teachers don’t know what does and doesn’t give you marks and, maybe more importantly, what you can and cannot be penalised for, then two students who know the same amount of content, can get different grades due to how well their teacher has prepared them in the technicalities of how the paper will be marked.

What can be done about it?

First of all we should acknowledge that there is an issue here. Yes, maths papers may be quicker to mark than others, but it doesn’t mean they are easier to mark. There is a page in every GCSE mark scheme that often gets ignored. It is maybe the most important page in the whole document. It outlines the underlying principles that should guide the examiners marking as they go through the paper. It decodes what all the letters mean and gives overarching advice applicable to every paper.

CPD Resources

If you want to test yourself, I made some resources. They consistent of an exam paper with mock responses and an MS Form where you can input the marks you have awarded the student. The Form will give you your score, not the score the student got, but a score of how accurately you marked the paper. This paper has been completed many times already and there is an Excel doc which has collated all the misconceptions that teachers have had when marking the paper. There is advice in there which can not only be taken forward when marking in the future but which can be shared with students as a way of increasing the marks they may achieve.

Here are the correct responses for the 6 questions used above along with the reasons why:

Here are links to the resources mentioned above or you can find them in the documents part of this site.

As a HoD or Curriculum Lead in a school this could be a good activity to check the quality of marking in the department. As an individual, you could just use this to test yourself. As a non-maths teacher, you can just use this to appreciate some of the finer complexities we have to deal with.

I’m always interested in what people make of this so please feel free to comment with thoughts, questions or incomplete musings. Follow this or my Twitter account Teach_Solutions for similar content in the future. Also, check out the rest of this site, there’s some good stuff knocking about the place.

Comic Strips

Comic strips in the maths classroom and 5 ways they can be of use.

When reading left to right it’s relatively simple to see how something has been created and, if tasked to replicate it, that would be a simple task. Very often in maths, we do not read left to right. This can mean that, once an exemplar has been created, it can be hard to see just how to recreate the process. Numbering steps is a solution but often a tricky one to do clearly. Comic strips however, can be incredible useful.

I want to show you three examples of these quickly so we all know what we’re talking about and then discuss a few ways they can used in the classroom.

Here’s one for creating an angle bisector:

Here’s one for expanding two brackets:

Here is an amended version of the previous with only the new content in red:

5 Ways these can be used:

1. For Reference

Simply show them to students either capturing electronically, producing live or sharing a Blue Peter “here’s one I made earlier” version with students once you’ve modelled the process. This can be shown on a board or printed for students to refer back to during the lesson. Obviously, if printed you run the risk of them becoming overly reliant on this piece of scaffolding but I will leave those choices up to you.

2. Variation Theory

Having these as a resource when looking at two different questions can be interesting. Comparing them side-by-side and looking at what is the same and what is different can help highlight underlying structures.

3. Questioning

Having students replicate the process step-by-step and then checking for understanding at each stage or asking questions that explore the “why” behind each stage can be useful.

4. Disciplinary Literacy

Exploring what the “caption” for each stage could be using academic vocabulary can help increase the levels of literacy in the room. It can also force students to use concise and accurate vocabulary.

5. Student Task

Having students create their own comic strip is a useful exercise which can help draw their attention to the key steps in the process. This might be best suited once the process has become fluent and you want them to think metacognitively about what they’ve been doing.

End

I hope you have fun exploring their use in the classroom. I think these are relatively simply to create, simply solve one question but take a screenshot or photo at each stage before building upon it. Try it out, in my experience it can be of huge benefit to students for certain topics.

I’m always interested in what people make of this so please feel free to comment with thoughts, questions or incomplete musings. Follow this or my Twitter account Teach_Solutions for similar content in the future. Also, check out the rest of this site, there’s some good stuff knocking about the place.

6 Ways To Get More Marks On A Maths Paper Without Knowing Any More Maths

Well I think the title of this one speaks for itself. Let’s stop dilly-dallying and get into it.

  1. SO WHAT?!

“So what?!” is the name of the first technique. It’s the idea that students need to aware that when giving a written response, or are being ask to “show that” something is true that they need to include the “so what”. The part highlighted in yellow are common responses from students, the bit in green, the “so what”, is often what’s missing:

It puts the answer in context and is the reason that sits behind the fact.

See another example and also a GCSE mark scheme for a different question that shows that without the “so what” students will not get the marks:

Teaching students to include a “so what” when written responses are required can be a quick way to pick up an extra mark here or there.

2. Number-Free Problems

This is a technique for not being stuck on those big, longer, context-heavy, wordier questions. Encourage students to ignore all the numbers and formulate a plan. I put it to you that this question is easier to answer when the numbers, which are initially superfluous, are ignored in the first instance. I appreciate people might have seen me talk about this before so I’ll be brief. If you want to read more about this then go here.

3. Brute Force Questions

There are questions that students might be asked that require no formal technique, just some good old perseverance. Let students know that these questions might come up and not to be put off by them. Trial and improvement, although no longer an explicit part of the curriculum, is still a perfectly valid technique. Check out these recent GCSE questions that students need not be freaked out by:

4. System 1 and System 2 Thinking

Students need to slow down and not run on intuition. Training them up about System 1 and System 2 thinking can really help. See here for the best way to do this.

5. Know the Mark Scheme

Students should be aware of a few things about mark schemes to help them out. Firstly, how easy the first/second mark in a big question can be to achieve, explicitly show them this and challenge them to get the first mark in a series of complex questions.

Students should also be taught what happens when you leave more than 1 valid answer in the answer space is.

6. Check Their Work

Have students sit an exam paper. Make sure the beginning is super-accessible for them. Let them work on it for 20-mins. Then let them know there will be a prize for the highest scoring paper.

There is a catch though. Their score is the total marks they have accrued up until the first time they drop marks. Sit back and watch them check through their own work like they never have before.

The important part is, once they are done, to have them reflect on that checking process. Highlight students who found and corrected mistakes. They need to be just as rigorous in the real thing.

There is a real mind-shift required when checking your own work rigorously and having them complete this exercise may be the first time some of them have ever done this. Make sure it isn’t the last!

Summary

These are all tips which can be introduced to students at any stage. Although they work great as tips to share just before they sit their exams, the earlier the better really. I hope these are useful. If you have any more, please share.

I’m always interested in what people make of this so please feel free to comment with thoughts, questions or incomplete musings. Follow this or my Twitter account Teach_Solutions for similar content in the future. Also, check out the rest of this site, there’s some good stuff knocking about the place.

Teaching: A Lonely Team Sport?

Is education a team effort or an amalgamation of solo endeavours? Whilst it can very much feel like the latter, done right, it has to be a collaborative mission, albeit an often lonely one. This post explores ways we might be able to make teachers feel part of a team.

Is education a team effort or an amalgamation of solo endeavours? Whilst it can very much feel like the latter, done right, it can and should be a collaborative experience, albeit an often lonely one.

In this post I’m going to ramble for a bit about my past then highlight 3 areas I think schools should be united on: behaviour, curriculum, and teaching & learning. I will also highlights ways in which teachers can be more aware of what is happening in others teachers’ classrooms so they know they are part of a team and not a soloist.

My Shameful Past

When I started teaching I didn’t see it as a team effort. I thought of my lessons as existing in isolation from everyone else’s. I would try my best to get through my day, teaching how I wanted, dealing with behaviour any way I could and embedding (or not) my own routines with my class. As long as I got through my lessons, through whatever means, I felt that I was doing my job well.

My favourite technique for managing behaviour was the “last 3 game”; this was borrowed from my old science teacher and wasn’t implemented in any other classroom. The rules were that the last 3 students to speak out of turn in the classroom would receive a detention. Names would go up on the board once the “game” began and then, once the 4th person spoke, their name would be added and the 1st removed. It worked wonders for controlling behaviour but I was only thinking of the consequences of this within the walls of my classroom.

I would also teach using methods and approaches I felt were best regardless of what they had already learnt. FOIL became the grid method, BIDMAS became order of operations, SOHCAHTOA went in the bin.

Great Schools

In my defence, it’s not that I was deliberately ignoring any school-wide practices, it’s just that there weren’t many. Thankfully, this seems to be changing. The best schools aren’t built with the flexibility to cater to every teacher’s whim. They are built with the students in mind; knowing that there are some things that, if consistent, will be of huge benefit to them. They are also built with ready-made systems that don’t require new or struggling staff to think of their own ways of managing behaviour whilst being flexible enough for experienced staff to still shine.

Your Autonomy Isn’t More Important Than Their Learning

Any good school leader is trying their best to create a team. Yes, we each have our own specialisms, which team doesn’t? But without a team pulling in the same direction there is no chance of a school being as effective as it otherwise could be. If you are looking for a profession where you have complete autonomy AND make the most positive impact you can on the lives of young-people, teaching is not for you.

The teachers in a great school are part of a team. They’ve learnt the same set-plays, have the same philosophy and look out for one another. The difficulty is that teaching is so often done in isolation of any of your teammates that it can too often feel isolating and those set-plays can quickly collapse with the fear of you being the only person trying to implement them.

Some (Brief) Practicalities

Let’s explore some of the ideas that should be coordinated across a school and look at ways you can make all staff feel like they are part of a team.

Curriculum

WHAT: The models students are taught, the ways they structure essays, the mnemonics used… needs to be uniform across a subject (or across multiple subjects if possible).

WHY: Without this, students will not be building on knowledge as effectively or efficiently as they should be.

HOW: Having the HoD create a document which contains this standardised ways of working should ensure all the team know about this. Ensuring that centralised lesson resources use these processes helps with consistency too.

SHARING: Joint book looks, co-planning and lesson drop-ins are all things which can be done to help staff know they are not the only ones delivering content in this particular way.

Behaviour Routines

WHAT: Habits of attention, rewards, sanctions etc should all be standardised. Not just the systems that are used but also what a student has to do to be recognised (positively or negatively).

WHY: Students deserve consistency. Not only will it make them feel safe and secure, by not having the goal posts move every lesson will help embed the positive behaviours you want to see them exhibit.

HOW: Getting into the minutiae about this is vital. School-wide training should involve various scenarios with a chance to script and practise responses. Staff should have the chance to clarify anything that needs clarifying and work on personalising the necessary responses to their own turns of phrase and personalities.

SHARING: If certain habits (hands up for silence, clicking for approval…) are to be used with students they they should be used with staff too. This can help foster a sense of team and also act as a constant reminder to staff of what is expected of them.

Lesson Structure

WHAT: The raw parts of a lesson, the beginning, middle and end of it, can be centralised with a common language and purpose behind each stage.

WHY: By having a “default” lesson structure, CPD can be tailored, lessons can feel safe and the excitement and passion can come from the content, rather than any novelties in the lesson itself. Also, teachers are not time-rich enough to produce an incredible and bespoke lesson for every hour that they teach, ensuring that base lessons are of a high-quality is vital.

HOW: Senior leaders should agree on a lesson structure which HoDs can then personalise. This should be shared with all staff in a department alongside the necessary training needed to produce a great lesson that fits this format

SHARING: Co-planning, sharing resources and lesson drop-ins are great ways to ensure that staff know this is happening everywhere.

Summary

As well as considering what systems you want to unify as a school you should also consider how you are going to make sure staff are aware that it is happening, with fidelity, in every other classroom too. Teachers spend so long with students, it can be easy to forget they are part of a team working for each child. Without cohesion and consistency amongst that team, we are letting the child down.

I’m always interested in what people make of this so please feel free to comment with thoughts, questions or incomplete musings. Follow this or my Twitter account Teach_Solutions for similar content in the future. Also, check out the rest of this site, there’s some good stuff knocking about the place.

Structuring a Maths Curriculum

A look at different curricula models alongside their strengths and necessary considerations.

I’m lucky enough to either have worked with or visited more schools than most people would ever get to see in a “typical” career. Of all the top-performing schools there are many things that are universal that won’t come as a surprise: high expectations produce a disruption-free learning environment, responsive teaching through mass participation (normally always using mini-whiteboards), explicit instruction as the main driver of information transfer, teachers know their students and make adaptations as necessary so they can access the curriculum on a par with their peers.

What can vary is the design of the curriculum as a whole. Despite how similar the how of the teaching can look, the what and the when can look very different.

I’m going to go through various models that I’ve seen and discuss the strengths and vulnerabilities of each approach as I see it.

  1. The “Mastery” Model

The Idea: Topics are explored in depth for long periods of time before moving on.

Rationale: With lessons fresh in students’ minds, ideas can be explored in real detail and “mastery” of each topic can be reached. The time is given to fully embed concepts meaning that students need not revisit them formally.

Vulnerabilities: With large gaps between revisiting content forgetting ideas is almost inevitable. Careful consideration of how ideas are retrieved over time is needed (typically this will happen at the start of lessons). Also, with ideas revisited less often there is a danger that students who do not understand the content first time around will be lost later. Ensuring content is pitched appropriately and that the key ideas from each unit are understood before moving on is essential.

  1. The Super Spiral

The Idea: The same ideas are seen frequently over time with each revisit becoming increasingly complex

Rationale: By seeing topics frequently content is unlikely to be forgotten. By going back a step each time to ensure content is secure before being built upon, you ensure understanding is solid.

Vulnerabilities: By spending little time on a topic there is a danger content is not explored in enough depth before moving on. Also, without good knowledge of a class’s current levels of understanding, topics risk being needlessly revisited each cycle. Accurate data capture is important in making sure time is not wasted in this model.

  1. The Big Question

The Idea: The curriculum is mapped to various themes or questions that engage and inspire students. For example, a question like “How can one zombie cause an apocalypse?” can bring in ideas from the world of statistics, proportion, graphs, exponential growth, and compound interest.

Rationale: Students are galvanised by an interesting question. Maths is made contextual and therefore engaging. Due to multiple ideas being explored in one theme, the links between seemingly disparate parts of the curriculum can be explored.

Vulnerabilities: Careful planning is needed to ensure complete curriculum coverage. The underlying structure of the mathematics must still shine through so students know what to apply and when in other contexts. Some ideas will be hard to not just be shoe-horned in due to their abstract nature – this risks devaluing the question being explored. Hard to differentiate for low-attainers if concepts are pinned to specific content and therefore harder to adapt.

  1. The Retriever

The Idea: Two or more topics are delivered simultaneously in an ABAB or ABCABC… lesson cycle.

Rationale: The benefits of mastery and retrieval are captured, with students given longer between ideas before they are revisited but with one topic still be explored over a relatively long time-frame.

Vulnerabilities: Lessons become the space of time with which learning needs to happen and this rigid structure can make the flexibility that is inevitably needed when teaching a unit hard to come by. Students missing a lesson can have more of an impact due to the disconnected nature of what is delivered. Complex concepts can become trickier to teach due to the larger than usual gaps between connected lessons.

Which is best?

Who knows? I believe I’ve seen most of them work well in different settings. In my experience the first one, the “mastery” model (inverted commas because of how contentious this phrase can be) is the easiest to implement effectively. They all have pitfalls though and need careful consideration

What do they ALL need to work?

No matter what approach is taken there are some universal considerations which must be made.

Flexibility – teachers need to have the autonomy to teach the content their class needs in relation to whatever topic should be covered at that point.

Accountability – systems need to be in place to ensure staff are progressing at a suitable pace for each class (time is not your friend when it comes to delivering the maths curriculum).

AO2/Ao3 – content cannot be the sole focus. Problem solving and reasoning needs to be weaved throughout the course.

Retrieval – however it is mapped out, once is never enough. Concepts need to be revisited over time.

Sequencing – parts of maths are more hierarchical than others.The ordering of some concepts are largely superfluous but others need careful consideration.

Tiering – at some point there needs to be a decision on the best diet to expose students to based on the tier of paper they will sit at the end of Y11.

Methodologies – no matter how the concepts are sequenced, where a model can be used across multiple concepts (bar models, grid method, proportion tables…) these should be agreed and universal across the department.

Summary

There is no perfect model and no “one size fits all” solution. Whichever model you choose ensure both the specific and universal considerations are made in order to maximise the strengths but minimise the inevitable weaknesses of your choice.

I’m always interested in what people make of this so please feel free to comment with thoughts, questions or incomplete musings. Follow this or my Twitter account Teach_Solutions for similar content in the future. Also, check out the rest of this site, there’s some good stuff knocking about the place.

Supercharge Your Mini-Whiteboards

5 tips to take your use of mini-whiteboards to the next level

The importance of checking students’ understanding and then responding to it can not be overstated. I’ve written about this before here. I’m yet to visit a highly performing school that doesn’t already know this. I’m also yet to visit one that doesn’t use mini-whiteboards (MWBs) as the main solution to this problem. If these aren’t already a staple in your classroom I would implore you to look into them. If you have a different solution which gives you reliable and near-instant feedback on the learning of every student in your class then I would sincerely love to hear what you are doing. This post looks at 5 different strategies that can be implemented to take your MWB use to the next level across a variety of subjects.

1. Tweak the Variables

This first technique combines some ideas from responsive teaching and variation theory. Once you’ve taught whatever it is you are teaching, write a question up on the board and have students answer it on their MWBs. Make sure all students end up with the right answer on their boards then start to Tweak the Variables. Tell students not to erase the answer. Then, in front of the students alter one small part of the question and ask students the following “by changing the least possible amount on your board, make it the correct answer to this new question”.

Not only does it give students the chance to exercise their efficiency (laziness?), it can really highlight to students what changes and what stays the same depending on the input.

Examples

Maths – Expand: 2(x+4) –> 2(x-4)–>2(3x-4)–>2x(3x-4)…

Languages – Translate: I eat–> You eat –> You swim –> We swim…

It’s important to end the sequence at some point, have students clean their boards completely and start again from scratch to ensure they can still do the full process. I speak about this in more detail with Craig Barton here.

2. Be Diagnostic

The last thing you want when using MWBs is to ask a question, be presented with a bunch of wrong answers or blank boards and not know what the gap is. Before asking anything that involves multiple steps or concepts check each one individually. These will inevitably be more basic questions than what you are building up to but if it gives students a chance to be successful, that’s no bad thing. Importantly though, if you build a question from the ground up and a student gives the wrong answer you know exactly what you need to do to intervene.

Examples

English: Write down a 2 word imperative sentence–> Identify an imperative in the poem which suggests the writer feels misjudged

Maths: Instead of asking students to complete a Pythagoras’ Theorem question, even once you’ve modelled it, check they can do the individual steps needed.

3. Think Write Pair Rewrite Share (TWPRS)

Chances are you’ve heard of Think Pair Share and probably Think Write Pair Share. By moving this onto MWBs and including a “rewrite” phrase there is a chance for students to take the discussions they have had in their pairs and improve their answers. Whilst this is what is supposed to happen during the “pair” part, the time for students to pause and reflect and then actually make the changes on their initial answer rarely happens. Adding this phase in allows for that to happen and adds an extra layer of accountability before thoughts are shared.

Examples: Anything you would use Think (Write) Pair Share with.

4. Mimic the Task

There is an invisible gap that exists in classrooms sometimes that can completely derail a lesson. It is the gap between what the questions looks like when the class are learning and what the questions looks like when the class are practising. I have seen too many lessons thrown into confusion not because a concept hasn’t been taught well-enough but because the format of the independent task is unfamiliar.

Luckily there is a quick fix, make sure that whatever format the questions start off as match the final questions you ask students as a class on their MWBs. It’s OK (and probably essential most lessons) for questions to deviate from this and more challenge to be introduced down the line. For the students’ sake though, make it a smooth transition and mimic the task as closely as you can before students are set off to work by themselves.

5. Engage then Expand

If the plan is to get students to give a longer and wordier answer than would be appropriate for a MWB then you will probably be best off using cold-call. That’s not to say that MWBs can’t enhance this experience though. Getting students to “dip their toes” into the water of the question with, for example, a quick multiple-choice question can increase engagement. Having all students commit to the beginning of the question before getting individuals to go deeper helps increase the amount of thinking happening in the room.

Examples:

Drama – In the scene we just watched, which had the biggest impact in creating tension A/B/C/D? Boards up. Tommy – why did you choose B? Asmah – you chose C, that’s equally valid, can you explain why?…

Anything you would use cold-calling for.

END

Best of luck trying these out. Let me know how it goes and if you have any other tips to supercharge MWBs.

I’m always interested in what people make of this so please feel free to comment with thoughts, questions or incomplete musings. Follow this or my Twitter account Teach_Solutions for similar content in the future. Also, check out the rest of this site, there’s some good stuff knocking about the place.

Emotion in the Curriculum

This short piece explores the big idea of including subject-specific emotions in our curricula, alongside the content and skills we may want students to learn.

Intro

Einstein said “Education is that which remains when one has forgotten everything one learned in school.” He alludes to forgetting content but not to forgetting how one was made to feel at school; I suspect, perhaps more than anything else, that is actually what remains.

What first hooked you onto your subject? What gave you that passion? How a subject makes us feel is crucial to our relationship to it. I worry that we too often leave our students emotional connections to our subjects to chance instead of finding explicit ways to create positive experiences.

The Good with the Bad

How often do we discuss how we want our students to feel? If it is our aim for students to become enthralled by our subject and develop a passion for it then emotions must be part of the discussion; the good and the bad. The joy of solving a maths problem is only enhanced by the struggle and turmoil that precedes it. The thrill of a win in sport is compounded by knowing the feeling of loss.

We need to ensure that we do not mollycoddle our students throughout their entire schooling giving them a sterlised and safe one-note experience. For without experiencing struggle, success is numbed. Without knowing sadness, one cannot appreciate joy. I worry in the past I have been guilty of this.

Every curriculum I’ve ever seen orders topics and skills. Not a single one talks about how they want their students to feel. Does yours? (If it does I’d love to see it). I’m sure most teachers would say they want students to feel certain ways but without making this explicit and mapping it out as a team I wonder how often this is achieved. Do you? Have you?

How does it make you feel?

How does doing your subject make you feel? Not when you teach it, but when you actually do it. What are the strongest emotions it can elicit?

I think the answers here vary subject-to-subject:

Maths – frustrated, surprised, proud, confused…

History – empathetic, optimistic, pessimistic, connected…

PE – exhausted, satisfied, proud, part of a team…

Art – creative, free, mindful, shook, pensive…

What would it be for your subject? If one of the above, what would you add? What would you change? Please add in the comments on to this very empty thread.

Entitlement

This should not require students to reach a certain level. If I want students to feel resilient in maths I can find a task designed for that purpose for any current attainment level. The same goes for making them feel surprised, happy, proud, stuck….

It might not be a tangible or measurable aim. It might not be something you can assess in a topic-test but it doesn’t make it not worthwhile.

Einstein said “Education is that which remains when one has forgotten everything one learned in school.” – he never mentioned forgetting how one felt; I suspect, more than anything else, that is actually what remains.

I’m always interested in what people make of this so please feel free to comment with thoughts, questions or incomplete musings. Follow this or my Twitter account Teach_Solutions for similar content in the future. Also, check out the rest of this site, there’s some good stuff knocking about the place.

Starting Strong

Some tips on how to plan and deliver that first lesson. Most likely appropriate for settings where great behaviour and compliance is not a guarantee.

Chipping Norton

When I was on my PGCE we would share horror stories with each other most Friday evenings. This was great fun and often very cathartic. There was an issue though. My first placement school was in Chipping Norton, a quaint market town in rural Oxfordshire. This was David Cameron’s constituency and he had opened their new science block. The school was a stone’s throw away from Jeremy Clarkson’s and Alex James’ houses (the latter would drop in to help the Y9 music students with their Britpop coursework). If you’ve built up a picture of what the students in this school are like, you’d be correct. As a place to hone the craft of teaching without worrying about behaviour, it was a trainee’s dream. The majority of other people on my PGCE were not in the same situation.

Once, in one of our Friday evening moan-fests, I joined in and mentioned how I had a student open a door for me, but in quite a sarcastic manner. Suffice to say, this did not go down well with other trainees who had been verbally abused, had someone start a fire in their classroom, and those that had been physically intimidated. Still, if you’d seen the smirk that kid had on his face when he opened the door for me, I think you’d understand.

I mention the above because I want to give some advice about how to start that first lesson in the academic year with a new class. This advice, I think, mostly holds for the sorts of schools I did not train in but have then spent the majority of my career working at. If these tips don’t seem necessary for you that’s not a problem. They are tips I’ve picked up, the hard way, that have helped me over time. If even one helps you too, that’s enough for me.

Before the First Lesson

  1. Decide the routines you want – Do not start your first lesson coming up with some sort of agreed behavioural charter. There are a lot of students in that room that will need clear rules and leadership. Decide what your expectations are in advance. What routines do you want your students to learn? What ways of working do you want them to have for different phases of your lesson? Decide on these and plan to communicate them, explicitly, with your students from day 1.
  2. Learn the policy – This one is particularly relevant if it is a new school for you. Speak to an experienced teacher and ask them what language the students are used to hearing from their teacher when it comes to using the behaviour policy. Are there verbal warnings, 3 strikes and your out, some sort of C1, C2, C3 system…. Whatever it is, use it, and the language associated with it confidently from day 1. It lets the students know you understand the systems in place. Do not make your own rules that go above, beyond or sideways to the school’s policy. This isn’t fair on the students and (fingers crossed) shouldn’t be needed.
  3. Content not a barrier – Plan lessons where the content is definitely not going to be a barrier to success. If this means pausing how ambitious the curriculum is temporarily, then so be it. It will be worth it in the long run and you need to be sure in the lesson that students are able to access the content you put in front of them as you establish the routines and culture you want. If some complain, let them know it will get more challenging over time as you get to know them better.
  4. Start tight and loosen later – Do not plan any outlandish lessons to begin with. Keep them routine and allow the challenge and intrigue to come from the content. Group tasks, talk tasks, lessons outside… can all wait until you have sorted out the basics.
  5. Make a Seating Plan – Let them know exactly where they will be sitting and stick to that initially. It will most likely be the first time a student challenges a decision you have made. If you can, check with a head of year that the plan is sensible but stick to it for that first lesson. Changes can be made at the start of the next lesson if needed but hold the line publicly with them all.

During the Lesson

  1. Learn their names – Have that seating plan to hand throughout the lesson and learn and use their names as much as possible. If there are pictures on your school’s data system then try to find them and put some faces to names in advance as well just to freak them out a little. It will mostly likely be the case that you end up learning where students sit before you learn who they actually are. I would get students to pack up early and move seats at the end of each lesson. They could only go if I got their name right. This meant I knew them and not just where they sat. This would continue until I would confidently get 100% correct every time. Letting students know that you want to know their names and that whilst they have about 10 new teacher’s names to learn, that you have hundreds of new students makes them sympathetic to the situation.
  2. Rehearse the routines – Have students rehearse the routines you want them to use. If you want a 5-minute silent starter then have 10 ready in advance and have students practise it until they get it right. It may make the first few lessons a slog but it’ll pay dividends in the long run. If you let one student talk in that first lesson, you are giving permission for them all the talk in the next one.
  3. Praise – Relax (or at least appear relaxed on the surface) and give students plenty of praise where it is earned. Not smiling until Christmas is an archaic notion you may come across. In a school with supportive behaviour management systems you should be able to be yourself and trust that the system has your back. Make students feel comfortable and let them know that their hard work will be rewarded.
  4. Firm but fair from day 1 – Do not make any special allowances because it’s the start of the year. Set out your stool early and do so clearly. Sanctions, where earned, will help students know where the line is. It is much easier to loosen rules later (though be sure of your rationale for doing so) than it is to tighten any.

After the Lesson

  1. Phone Home – Phone home for students with a (rough) 3:1 ratio of positive to corrective messages. This is likely not sustainable in the long run but only needs to happen for the first week or so.
  2. Over-Mark their work – This is not sustainable in the long run either, but having eyes on students work initially and writing comments and picking up on issues early on is a great way of preventing them from arising further down the line. Give them your most attentive self for the first 2 weeks then ease off into a more sustainable way of working afterwards.
  3. Catch up Individually – Meet students on an individual basis, with a head of year or form tutor if necessary, that did not act how you wanted and spell out very clearly, what you expect to see of them next time and how sure you are that they can rise to the expectations you are setting for them.

There are a few more tips focused on behaviour which may be useful here.

If you have any more to add then please do so in the comments.

Best of luck with the start of your year!

I’m always interested in what people make of this so please feel free to comment with thoughts, questions or incomplete musings. Follow this or my Twitter account Teach_Solutions for similar content in the future.